Our vision is to simplify manufacturing complexities and shorten project cycles for our customers through our rich manufacturing and design experience. Our success is defined by our customers' success
Quick Links
Mar. 15, 2025
Time to read: 5min
Writer: Cavin
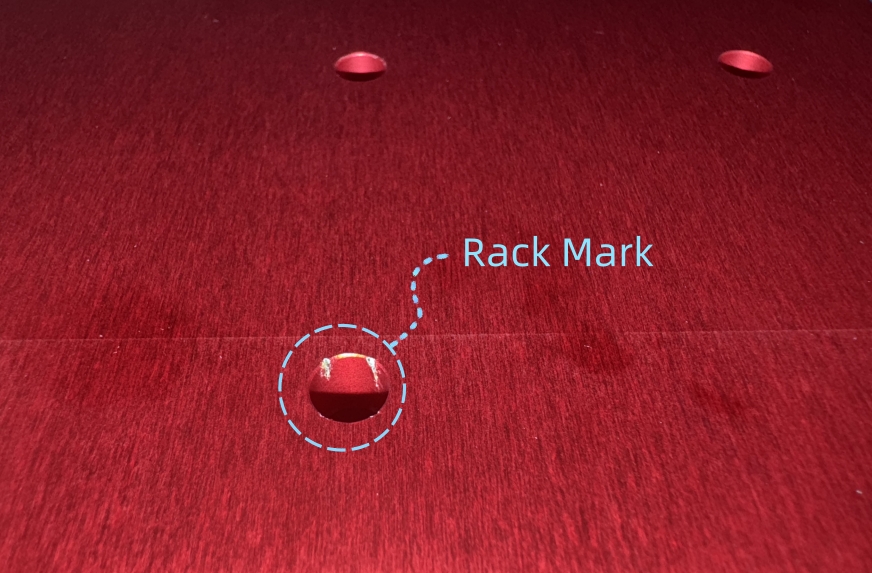
Rack marks are the small contact points leaving exposed areas on the anodized parts as a result of the process. As a professional CNC machining factory, we understand that aluminum parts often require surface treatment after machining, and anodizing is one of the most commonly used processes. Anodizing not only enhances the corrosion resistance and durability of parts but also provides an attractive finish. However, many customers notice small marks on the surface of their anodized parts, known as Rack Marks. So, why do these marks occur? How can we choose the best locations for racking? And what should we recommend to customers if there are no suitable racking points? This article will provide detailed answers to these questions

what is rack mark in anodizing?
Anodizing Rack Marks refers to visible marks or blemishes left on metal parts after the anodizing process. These marks occur where the parts are in contact with the racks or fixtures used to hold them during anodizing. The contact points block the flow of electrolyte and current, preventing proper oxidation and resulting in uneven coloring or surface finish. It's a common issue in anodizing.
Why Does Anodizing Leave Rack Marks?
Anodizing
is an electrochemical process that converts the surface of aluminum
into an aluminum oxide layer. During this process, parts must be in
contact with racks in the anodizing tank to ensure electrical current
flows through the part. Racks serve two critical functions: holding the
part securely and conducting electricity.

1. Functions of Racking
Mechanical Support: Racks ensure that parts do not fall or shift during the anodizing process, especially in complex chemical baths.
Electrical Conductivity:Racks are the only pathway for electrical current to reach the part, ensuring uniform oxidation across the surface.
2. Causes of Rack Marks
Current Concentration: At the contact points between the rack and the part, the current density is higher, which can lead to uneven oxidation.
Contact Obstruction: The contact points block the flow of electrolyte and current, preventing the formation of a complete oxide layer and leaving visible marks.

3. Impact of Rack Marks
Aesthetic Concerns: Rack marks often appear as small unanodized areas or color inconsistencies, which can affect the part's appearance.
Functional Concerns: If rack marks are located on critical functional areas (e.g., sealing surfaces or mating surfaces), they may compromise the part's performance.
How to Choose Suitable Racking Locations?
Selecting
the right racking locations is key to minimizing the impact of rack
marks on both aesthetics and functionality. Here are some best practices
based on our experience:
1. Suitable Racking Locations
Non-Functional Areas: Choose areas that do not affect the part's functionality, such as the back, bottom, or internal structures.
Hidden Areas: For parts that will be assembled, select areas that will be concealed after assembly.
Clearance Holes: Use existing Clearance holes as racking points to ensure electrical conductivity while minimizing visual impact.
Flat Surfaces: Flat and stable areas are ideal for racking, as they ensure tight contact between the rack and the part.
2. Unsuitable Racking Locations
Visible Surfaces: Avoid racking on surfaces that require a high-quality finish, especially for dyed or decorative anodizing.
Functional Surfaces: Do not place rack marks on sealing surfaces, mating surfaces, or high-precision machined areas, such as fine holes and fine slot.
Thin-Walled Sections: Thin-walled areas are prone to deformation under the pressure of racks and should be avoided.

What If There Are No Suitable Racking Points?
In some cases, part designs may not have obvious locations for racking. Here’s how we can advise customers:
1. Optimize Part Design
Add Process Holes:
Incorporate dedicated process holes or threaded hole during the design
phase for racking. These holes can be sealed or ignored after anodizing.
Reserve Racking Areas: Designate flat or hidden areas specifically for racking to facilitate the anodizing process.
2. Use Specialized Racks
Titanium Racks: Titanium racks offer better conductivity and smaller contact areas, reducing the visibility of rack marks.
Spring-Loaded Racks: For complex geometries, spring-loaded racks can minimize pressure on the part’s surface.
3. Communication and Collaboration
Early Communication: Discuss anodizing requirements with customers during the design phase to optimize part designs.
Provide Samples: Share anodized samples with customers to help them understand the impact of rack marks.

Conclusion
Rack
marks are an inherent part of the anodizing process, but their impact
on part appearance and functionality can be minimized through careful
racking location selection, part design optimization, and the use of
specialized racks. As a professional CNC machining factory, we are
committed to delivering high-quality machining and surface finishing
services. If you have any questions or need assistance with anodizing,
feel free to contact us for expert solutions.
Previous Post:
Comprehensive Guide to Anodizing Types and Applications: MIL-A-8625F Standards for CNC ManufacturingNext:
None
Search
Service
CNC Machining Parts Made By 91 MNS

Talk to Us About Your New Project!
Get a Quote